Arduino and GSM Connection
by Andre | September 29th, 2013 | Comments | Share
Tags : arduino gsm electronics internetofthings solar
There is a lot of talk recently about the Internet of Things , objects that are uniquly identifiable and connected to the Internet. On my hydroponic garden setup, each plant has a unique ID and and I collect unique information such as date planted, date it germinated and when I harvested it.
The problem was how do I connect the controlling system to the Internet. In version 2 of my pump controller, I use an Arduino computer , the size of a stick of chewing gum, to manage the pumping cycle. I can program it to pump the water whenever I want it to. The previous system had a 12V timer that only had 8 programs and during summer that is too few pumping cycles and the plants started to stress due to a lack of water. The whole system is still running off solar power, using a 5 watt solar panel and a 7Ah lead-acid battery.
After much research I found a GSM board from MikroElectronika that had all the requirements I needed. Low power, small footprint and easy to connect to any Arduino. The features are:
- Quectel M95 GSM/GPRS module which supports GSM850MHz, GSM900MHz, DCS1800MHz or PCS1900MHz quad-band frequencies with 85.6 kbps GPRS data transfer.
- Board contains quadrupole audio/microphone jack, SMA antenna connector, as well as the SIM card socket.
- GSM Click communicates with the target microcontroller via seven mikroBUS™ lines (RX, TX, INT, PWM, CS, RST and AN).
- Board can use either 3.3V or 5V power supply and I/O voltage levels.
- LED diode indicates the presence of power supply.
A bit more technical...
The GSM2 Click is easy to connect to an Arduino. Here are the steps:
- Change the SMD (Surface Mount Device) jumper from 3.3V to 5V. This means unsoldering it and resoldering it across the 5V marker. The GSM2 Click has a built in support for both 3.3V or 5V. The Arduino's digital pins output at 5V so there is no need to have any pull-down or up resisters. There are no other parts to add to get the system working!
- It is not necessary to solder the two 8pin heaeders to the GSM2 Click board, unless you are going to use it on a breadboard. For production environments, just wire the 5 or 6 wires required.
- Connect the 5V output from the Arduino to +5V pin, GND to the GND.
- The trick to get the two modules to talk to each other is that the TX pin from the Arduino must be connected to the RX pin of the GSM2 Click and the RX pin from the Arduino must be connected to the TX pin of the GSM2 Click. This is where the talking happens between the two devices.
- Some people complain that nothing happens when they power up the modules except that the power light comes on, on the GSM2 Click. By default the GSM2 Click powers up in standby mode. You need to send a 1 second high signal to the PWK pin to switch it on and later a 1 second high signal to power it down. You can use any digital out pin on the Arduino to do this programatically or put a momentary switch (push-on release-off) between 5V and the PWK pin.
- You an monitor pin STA on the GSM2 Click to see if the system is powered up.
- NB! If you are going to use the standard Arduino GSM library, you need to use Pin 2 as RX and Pin 3 as TX on the Arduino. If you are using the Arduino Serial library, using AT commands, you can use any pin you like.
-

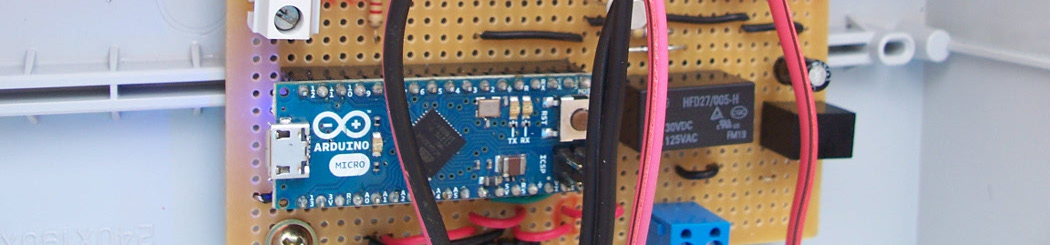
The Ardunio Controller
THe Arduino Micro on a vero-board used to control the pumping cycle.
-
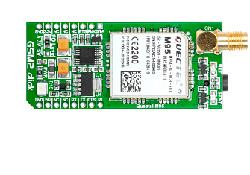
GSM2 Click GPRS Module
The easiest way to connect the Arduino to the GSM network without a shield.
-
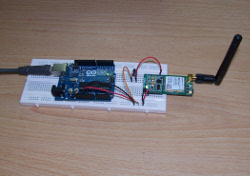
GSM2 Click connected to an Arduino Uno
Sending data using the GSM network using just the GSM2 Click module.
Conclusion
After searching the web for a suitable solution, this module is by far the best to work with. It is easy to connect, easy to program, can be put into a low-power mode and has a small footprint.
Useful Links
http://www.mikroe.com/click/gsm2/
GSM2 Click Manual
M95 Chip Product Page
http://arduino.cc