
Like the information, please donate to support hosting.
Using a Raspberry Pi to create an Ouranos Sky Chart
by Andre | September 12th, 2020 | Comments | Share
Tags : raspberrypi weather
Introduction
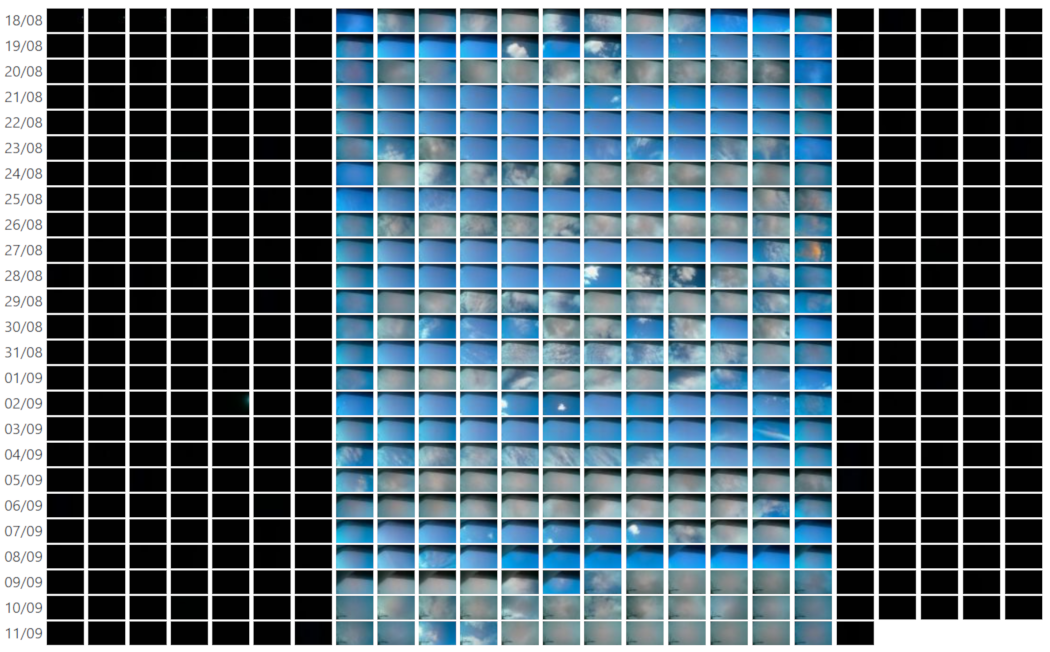
An Ouranos Sky Chart is an image made from a composite of images taken every hour of the day of the sky. Ouranos (anglicized as Uranus) was the primordial god of the sky. The chart shows what the weather was like every hour of the day and when it was sunrise and sunset. Over a period of a year you can see how the rising and setting times of the sun varies depending on your location. Closer to the equator the change becomes less.
Build
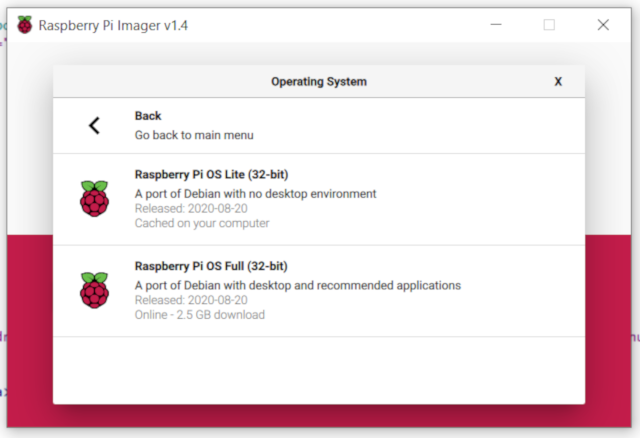
I used a spare Raspberry Pi Zero W, connected to a Raspberry Pi camera. It needs to be the one that can connect to the Internet using WiFi. I used the Raspeberry Pi Imager to create an image for the SD card. I installed the Raspberry Pi OS Lite (32bit) image as I did not need the desktop environment. If you choose the full version, you just need to change the boot option to boot to the command prompt and not the desktop environment.
Insert the SD Card and boot up your Raspberry Pi.
Update the Raspberry Pi to the latest software version by running the following commands. You can do this periodically to keep the software up to date. I run it about once a month.
-
sudo apt-get updateThis will update the catalogue of installed software. -
sudo apt-get upgradeThis will update the software to the latest version. It will ask you if you are sure you want to update. Press Y and Enter. -
sudo reboot nowThis will reboot the Raspberry Pi
Log into your Raspberry Pi again and complete the following steps. This will create the procedures to take the photograph, upload it to the server and if successful, delete the copy on the Raspberry Pi.
- In the main folder when you log in, create a folder called
cameraby typing the following commandmkdir camera - Create a bash script called
camera.sh. I use the nano editor, so I use the following command:sudo nano camera.sh. - Copy and paste the following code:
#!/bin/bash DATE=$(date +"%Y-%m-%d_%H%M") raspistill -w 640 -h 400 -q 75 -o /home/pi/camera/$DATE.jpg FILE=camera/$DATE.jpg if [ -f "$FILE" ]; then echo "$FILE exists." echo Uploading file "$FILE" status=$(curl --write-out '%{http_code}' --silent -F file=@"$FILE" -F h=<your unique hash ID code goes here> -F submit=submit http://<your server's domain>/api/camera_upload.php) echo $status if [[ $status == 200 ]] then echo Deleting file... rm "$FILE" else echo Problem uploading file fi else echo "$FILE does not exist." fi - I created a second script to run at quarter past the hour to upload any prevous images that might have not uploaded, for whatever reason.
- Create a bash script called
upload.sh. I use the nano editor, so I use the following command:sudo nano upload.sh. - Copy and paste the following code:
for file in camera/* do echo "$file exists." echo "Uploading file $file" status=$(curl --write-out '%{http_code}' --silent -F file=@"$file" -F h=<your unique hash ID code goes here> -F submit=submit http://<your server's domain>/api/camera_upload.php) echo $status if [[ $status == 200 ]] then echo Deleting file... rm "$file" else echo Problem uploading file fi done - Next we create a cron job to run the two scripts every hour. The
camera.shscript runs on the hour and theupload.shscript runs at quarter past the hour. - Enter the following command
crontab -e - The first time you run
crontabyou'll be prompted to select an editor; if you are not sure which one to use, choosenanoby pressing Enter. - Scroll to the bottom with the cursor and add the following two line:
0 * * * * /home/pi/camera.sh 2>&1
15 * * * * /home/pi/upload.sh 2>&1 - Save the file
Ctrl-O, followed byCtrl-Xto exit the editor. - To check if the cron jobs are saved, you can type in
crontab -l
Next we must update the security setting for the bash scripts by running the following two commands:
sudo chmod +x camera.sh
sudo chmod +x upload.sh
This is all you have to do on the Raspberry Pi.
Server
I use a LAMP server running PHP and mySQL. I have hosted this software on a shared server as well as a dedicated LightSail LAMP server running on Amazon's AWS infrastructure.
The code consists of the API section to read the uploaded file and a page to display the collected data. I've added the facility to identify each person who uploads images to the server, using a unique hash.
Here are some snippits of the code used to read the uploaded file. You can create your own API endpoint or use the website oranos.co.za
if (isset($_POST['submit'])) {

	$file = $_FILES['file'];

	$file_name = strtolower($_FILES['file']['name']);
	$filetmpname = $_FILES['file']['tmp_name'];
	$file_size = $_FILES['file']['size'];
	$file_error = $_FILES['file']['error'];
	$file_type = $_FILES['file']['type'];

	$fileExt = explode('.', $file_name);
	$fileActualExt = strtolower(end($fileExt));

	$allowed = array('jpg','jpeg','png', 'gif');
	if (in_array($fileActualExt, $allowed)) {
		if ($file_error === 0) {
			if ($file_size < 1000000) {


        // Process the file here...


			} else {

				http_response_code(413);
				// echo "File size too big";

			}

		} else {

			http_response_code(500);
			// echo "Error while uploading your file";

		}

	} else {

		http_response_code(415);
		// echo "Unsupported Media Type";

  }

} else {

  http_response_code(413);
  // echo "No Post detected";

}