
Like the information, please donate to support hosting.
Connecting the Catalex MicroSD Card Adaptor to an Arduino UNO
by Andre | September 10th, 2017 | Comments | Share
Tags : arduino electronics
I bought the Catalex MicroSD Card Adaptor from Banggood. It was cheap and the price usually includes postage. I tried to connect it using the standard SD library. I just could not get it to work. After almost giving up, I decided to learn how SD cards work and what needs to be connected to what. I eventually got it to work. This is how it is done!
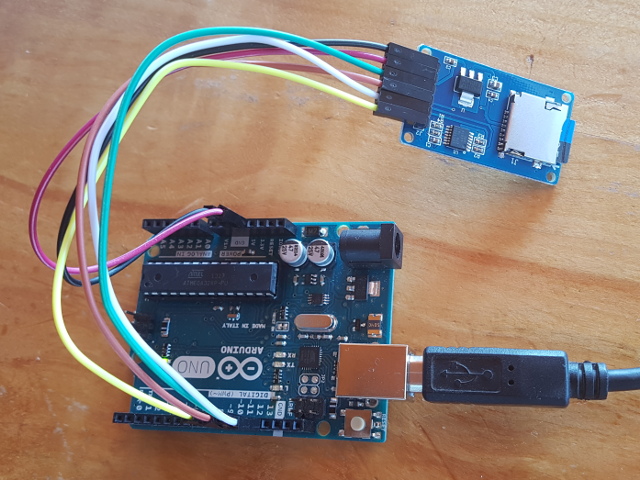
The adaptor uses the following pins: GND, VCC, MOSI, MISO, CLK, and CS. The connection is as follows:
| Arduino UNO | MicroSD Adaptor |
| GND | GND |
| 5V | VCC |
| Pin 11 | MOSI |
| Pin 12 | MISO |
| Pin 13 | CLK |
| Pin 9 | CS |
The MOSI and MISO pins are standard. The CLK was connected to the Arduino's SCK pin. SCK stands for SPI ClocK. CLK stands for SPI CLocK. Two different acronyms for the same thing.
The CS (Slave Select) pin can be connected to any Arduino digital output pin. Just update the pin number in the code, inside the function call SD.begin()
Here is working code:
          /*

          MicroSD Card Read / Write
          This example shows how to read and write data to and from a MicroSD card file

          The circuit:
          SD card attached to SPI bus as follows:

          MOSI - pin 11
          MISO - pin 12
          CLK  - pin 13
          CS   - pin 9

          */

          #include <SPI.h>
          #include <SD.h>

          void setup() {

            // Open serial communications and wait for port to open:
            Serial.begin(9600);
            while (!Serial) {
              ; // wait for serial port to connect. Needed for native USB port only
            }

            Serial.print("Initializing SD card... ");
            if (!SD.begin(9)) {
              Serial.println("Initialization failed");
              return;
            }
            Serial.println("Initialization done");

            // Open the file. note that only one file can be open at a time,
            // so you have to close this one before opening another.
            File myFile = SD.open("testsd.txt", FILE_WRITE);

            // If the file opened okay, write to it:
            if (myFile) {
              Serial.print("Writing to testsd.txt...");
              myFile.println("Testing 1, 2, 3");
              // close the file:
              myFile.close();
              Serial.println("Done");
            } else {
              // If the file didn't open, print an error:
              Serial.println("Error opening testsd.txt");
            }

            // Re-open the file for reading:
            myFile = SD.open("testsd.txt");
            if (myFile) {
              Serial.println("testsd.txt:");

              // Read from the file until there's nothing else in it:
              while (myFile.available()) {
                Serial.write(myFile.read());
              }
              // Close the file:
              myFile.close();
            } else {
              // if the file didn't open, print an error:
              Serial.println("Error opening testsd.txt");
            }
          }

          void loop() {
            // Nothing happens after setup
          }
When the code runs it checks to see if the card is initialised. If successful it will write the line "Testing 1, 2, 3" to the end of the file testsd.txt. It then reads the testsd.txt file and writes the contents of the file to screen.
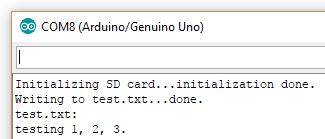
This example confirms that the standard Catalex MicroSD Card Adapter V1.0 11/01/2013 does work with the Arduino code.